If you’ve ever created an LSMW from scratch, you’ll probably remember seeing the option in the first step for “Once-Only” and “Periodic”. The vast majority of those that I’ve created use the default setting of “Once-Only”. But these objects are not really designed so that you can only run it once – you can run them over and over. Even the most basic objects – for example, updating the material master’s description – can be used again and again. The option for Periodic refers to the potential for this object to be run in the background – periodically – using source data placed on the SAP’s application server.
To make this work, open the “Maintain Object Attributes” step in change mode.

Switch your object to “Periodic” from the default “Once-Only”.

This adds an extra step at the end of the list of steps called “Frame Program for Periodic Data Transfer”.

Don’t worry about what this step does until you’ve completed all the other steps you normally go through – including, and especially, the running of the batch input session (or other program option – like IDoc or direct input) in the background. Once you are confident that your object is working as you expect, drill into this new last step. There are a lot of options to review in here, so I’m going to break it down section by section – all eleven of them!
Let me start by saying that this step is nothing more than a program that calls other programs – specifically, the Read Data, the Convert Data, and (generally) the Create & Run Batch Input Session steps. The settings I’ll discuss below will be saved into a variant. The program and its variant will be assigned to a step in a background job. Although this step can be used with IDoc and direct input programs, my examples below refer only to batch input.
Section 1 – Project, Subproject, Object
This section simply identifies the project, subproject, and object that will be running periodically.

Section 2 – General Parameters
Here you will identify a couple of general parameters, but be aware that they may not apply to your situation. Don’t feel obligated to put something here just because you can.

I checked the documentation for the program to see if they had anything to say about flag files. It said:
Das Programm unterstützt die Flag-File-Technik. Ist ein Flag-File angegeben, so wird die Verarbeitung nur dann aufgenommen, wenn dieses File existiert. Nach Ende der Verarbeitung wird dieses File gelöscht. Hierdurch wird mit einfachen Mitteln ein “Handshake” mit der Quellanwendung realisiert.
Got that? Loosely translated: if the specified flag file exists in the location identified, then the program will begin. When the program completes, the flag file gets deleted thus creating a simple “handshake” mechanism with the source of the data. Essentially, the flag file acts as an indicator for the program to start rather than simply processing the data file every time the program runs. In theory, the source of the data could still be updating or even locking the data file when the program runs. With the flag file approach, only once the program sees this “flag” does it start to act on the data file. Every time the data source is ready for LSMW to start processing the data file, it should create another flag file.
The second input is for the wildcards that you created in the Specify Files step. Obviously, multiple wildcards could be identified.
Sections 3 and 4 – Handling of Input File (Legacy Data) and Handling of Imported and Converted Data Files
These are the options for what can be done with the source data file, the read (imported) and the converted files after processing is complete.


You can: a) leave it as it is, b) delete it, or c) rename it. The renaming option appends a date/time stamp at the end of the file name separated by underscores. The stamp’s format is:
_YYYYMMDD_hhmmss
where:
- YYYY is the year (e.g., 2014)
- MM is the month with a leading zero when applicable (e.g., 02 for February)
- DD is the day with a leading zero (e.g., 08 for the eighth day)
- hh is the hour on a 24-hour clock with a leading zero (e.g., 15 for 3 pm)
- mm is the minute with a leading zero (e.g., 03 for the third minute), and
- ss is the second with a leading zero (e.g., 09 for the ninth second).
In the program that I created for my client, I used the Rename option. I thought it best to keep each source data file and use an archiving strategy to store them if a historical review was necessary.
Section 5 – Read Data
You’ll recognize this section as similar to the Read Data step. The first two inputs function exactly the same as they do in that step.

The only difference is the last input. This is a screen variant you may have created for the Read Data step. You could, for example, limit the number of transactions read through an explicit number or range of numbers. You could even define a selection parameter on a source field. Unfortunately, there is no dropdown for the variant input so you’ll need to remember what you created as opposed to looking it up. There is also no validation against this field, so if you get it wrong the system is not going to tell you so.
Note: Remember that every LSMW object has a unique program name for both the Read Data and Convert Data steps so screen variants created for these steps will also be unique. The program finds the appropriate Read or Convert Data program via the inputs from Section 1.
Section 6 – Convert Data
Like Section 5, this section looks similar to what you’d see if you were to run the Convert Data step – when your LSMW object is a BAPI or IDoc type.

The last input is also like the last from Section 5, but applies regardless of the type selected in the Object Attributes step. You can specify a screen variant that you may have created for the Convert Data step. Like before, there is no dropdown for and no validation against this input field.
Section 7 – Import Data: Batch Input
For LSMW objects that utilize batch input sessions to process data into SAP, this step is relevant.

You have the option to simply create the session or create and process. The function of the checkbox shown here isn’t very clear from the description. If you check the box, it means that the “Create Folder and Process” step will process all sessions with the name identified regardless of whether they are new or not completed due to errors. Moreover, I believe I’ve uncovered an inconsistency in the underlying code. This checkbox currently only applicable when you select the Standard Batch/Direct Input for your LSMW object type – it does not apply when you have a recording type. This is an important point and one that drove me to use only the first option above – see my final thoughts at the end of the post.
Section 8 – Import Data: Direct Input
For LSMW objects that utilize direct input programs to process data into SAP, this step is relevant.
![]()
Leave this checkbox selected if you want the direct input program to execute as a part of the periodic processing. Some examples of a direct input programs are RMDATIND (material master), RCRAPDX2 (work center), and RCPTRA02 (routings).
Section 9 – Import Data: Recording
For recording type LSMW objects, this is equivalent to the “Create Batch Input Session” step.

If you work with recording type LSMW objects frequently, you’ll need no explanation of the inputs here. The Converted Data file defined in the Specify Files step should populate automatically here. The name of the batch input session will be shortened to the first twelve letters of your LSMW object’s name. Your user ID will default into that field. When creating the variant for your job, consider using a system ID so that you don’t run into authorization issues when the batch input session gets processed. Check the box if you wants successfully completed sessions to remain in the list.
Section 10 – Import Data: IDoc
When using IDoc type LSMW objects, this section defines whether the periodic processing will only create the IDocs or create and initiate processing of those newly created IDocs.

Section 11 – Parameters of some Batch Input/Direct Input Programs
Finally, this section is a catchall for parameters not defined or captured in the previous ten. The functions behind these settings here are not very obvious; there is no underlying documentation except on the variant and we already know what that one does. I delved into the program itself to see what I could find and, thankfully, found some comments that identify what each input does or at least what program might use it.
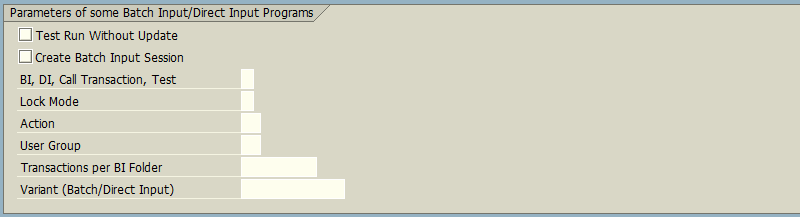
Test Run Without Update – according to the comments in the program /SAPDMC/SAP_LSMW_INTERFACE, this setting is apparently related to programs RAALDD01 and RAALDD11. However, these program names do not exist. I contend that the comments should refer to RAALTD01 and RAALTD11 – loading fixed assets via batch input or direct input. I have not personally used either of these programs, but I briefly looked into their steps in researching this post. In each case, I found a setting similar so I think it confirms my suspicions. Not being familiar with fixed assets myself, it might be a normal action to execute a test run but I’m not certain.
Create Batch Input Session – the comments in the underlying program has the text “RCCLBI01 etc.” This program is used for loading classes. In the step of the same name, you’ll find an indicator that, when checked, creates batch input sessions for all data. The alternative is to process the data online. I have to admit I don’t understand how you would process the data any other way with a background job, but I might have to test to understand it better. In the underlying program, it is clear that there are a number of programs which utilize this indicator: RCCLBI02 (create classification data), RCCLBI03 (maintain classification data), RCCTBI01 (create characteristics), RCSBI010 (create BOMs), RCSBI020 (change BOMs), RCSBI030 (create variant BOMs), RCSBI040 (create BOMs with all long texts), RCVBI010 (create document info records), RLBEST00 (initial entry of stock), and RLPLAT00 (create WM storage bins).
BI, DI, Call Transaction, Test – for programs RFBIBL00 (Financial documents) and RHALTD00 (Personnel Planning). For the former, there are three options: B for batch input, C for call transaction, and D for direct input. The reason for the different options is system performance – option B is slow, C is faster, and D is really fast. According to the help documentation, C and D should be used in cases where more than 10,000 transactions will be posted. You might think B and C sound the same because a batch input session does call the transaction, so why is there a call transaction option? Quoting from the documentation, when using option C, “the documents are posted immediately by calling the corresponding transactions. The same screens are processed for the batch input.” Option C goes through the motions of a batch input session without actually creating one. In the case of the latter program, your options are B for batch input or T for test mode. Much clearer here, right?
Lock Mode – used exclusively for program RMDATIND. Possible values are E (exclusive) which should be used for changes to existing data and N (do not lock) which should only be used when creating new materials.
Action and User Group – both are applicable for program RPUSTD00 – loading HR master data. I am not familiar with the HR module at all so cannot speak to what these fields do specifically. The first is related to Personnel Actions – although there is no dropdown in the periodic program, there is one on the create batch step. The values come from table T529A. The second is not as easy to pin down. It appears that it is related to menu setup and defined in some combination of table T588B and T588D. Perhaps one of my readers can shed more light on these settings?
Transaction per BI Folder – you’ll find this on many create batch steps. You can limit the number of transactions included in a particular batch input session. If the number exceeds the number of converted transactions, the system will create another batch input session and repeat until all converted transactions are included in sessions.
Variant (Batch/Direct Input) – you can specify a screen variant that you may have created for the Create Batch or Direct Input step. These steps, like the Read and Convert steps, are unique to each LSMW object. And, as before, there is no dropdown and no validation on this field. If a variant is identified, the contents of that variant will take precedence over any values in the fields above.
Final Thoughts
So you might be thinking – thanks for the long explanation, but what do I do with this?
Here’s what I did:
I created an object with multiple recordings with a large amount of underlying validation code. The source data files are placed on the application server 15 minutes before the top of every hour by an external middleware. The periodic job runs at the top of the hour and is comprised of two steps. The first does all of the LSMW steps except for processing the batch input session. The second processes that newly created session. I separated the sessions because of the reason I pointed out above. I knew that occasionally there would be sessions that had failed records and I wanted the end users who monitor this process to take action independently of the background job. The results of both job steps are emailed to the end users. The source data file is renamed using the methods described above.
Obviously, we could have created a custom ABAP program to handle this, but I thought it would be interesting to try this approach and convinced my client to let me try. It’s been in place for nearly a year now and working fine.

2014/09/11 at 08:03
Hi feimster,
Great explanation.
Here my Doubt is, Can we upload a file from Presentation server or only from Apllication server?…Thanks.
Regards,
Trinadh
2015/02/25 at 16:24
Very useful. I use LSMW a lot but not often with the periodic option. (We use periodic LSMs to allow users to upload their own data). I found this when checking up what the flag file was, but it’s all good as a refresher.
2015/02/26 at 19:16
Thanks for the kind words, Elizabeth! I’ll try to keep posting more tidbits as I come across them.
2015/06/12 at 00:10
Hi, I’ve performed all the above steps to load material master periodically using direct input method but still I am getting the error –
Data does not match the job definition; job terminated
Any help will be appreciated.
2015/06/12 at 00:32
I did resolve the error. Thanks in any case.
2015/06/14 at 15:47
I’m glad to hear you resolved the problem. Can you explain what you did to help others who may have similar issues?
2016/02/19 at 19:49
[…] that LSMW would be a good tool for this since I can schedule it to run (as I described in this post). Within LSMW, I made recordings for both create and change with this transaction and […]
2018/01/05 at 20:26
Hi feimster,
i inted to create a transaction (to run this program in the foreground) for my users to run lsmw without having a real access to it. it works using the trick via this interface. However users are promted to start read, convert and bi-session programs. Do you have any idea how to supress this promting and let the program execute all steps till the end automatically?
cheers
rafael
2018/01/16 at 13:42
Interesting idea! Did you already look at program /SAPDMC/SAP_LSMW_INTERFACE to see how it performs those functions in the background?